


If there’s one deceptively simple exercise that offers massive benefits, it’s the farmer’s carry.
Maybe you’ve spotted someone striding across the gym with heavy dumbbells or heard coaches rave about these loaded carries for grip, core, and full-body strength. But this is one of those exercises you have to try to understand the full benefits.
Once a hidden gem in strongman circles, the farmer’s carry has earned mainstream recognition in recent years thanks to its inclusion in Hyrox races. Still, many lifters underestimate its value. It's not a difficult movement to learn, but ignoring it could cost you valuable seconds in a race or leave gaps in your overall strength.
Whether you’re training for a race and want to carry smarter, or you’re simply looking to level up your grip, core, and full-body strength outside of traditional lifts—mastering the farmer’s carry should be on your radar.
In this guide, we’ll break down how to do farmer's carries with proper form, smart variations to try, and programming tips for Hyrox athletes and everyday lifters alike. Plus, Gymshark and Hyrox Elite 15 Athletes, Jake Williamson and Sinéad Bent, reveal their go-to training tactics and race-day tips to shave seconds off your time and finish strong.
From the best matching sets to stretchy shorts that won’t hold you back and moisture-wicking T-shirts to keep you cool, we’ve got the gym fits you didn’t know you needed.
What Is the Farmer’s Carry?
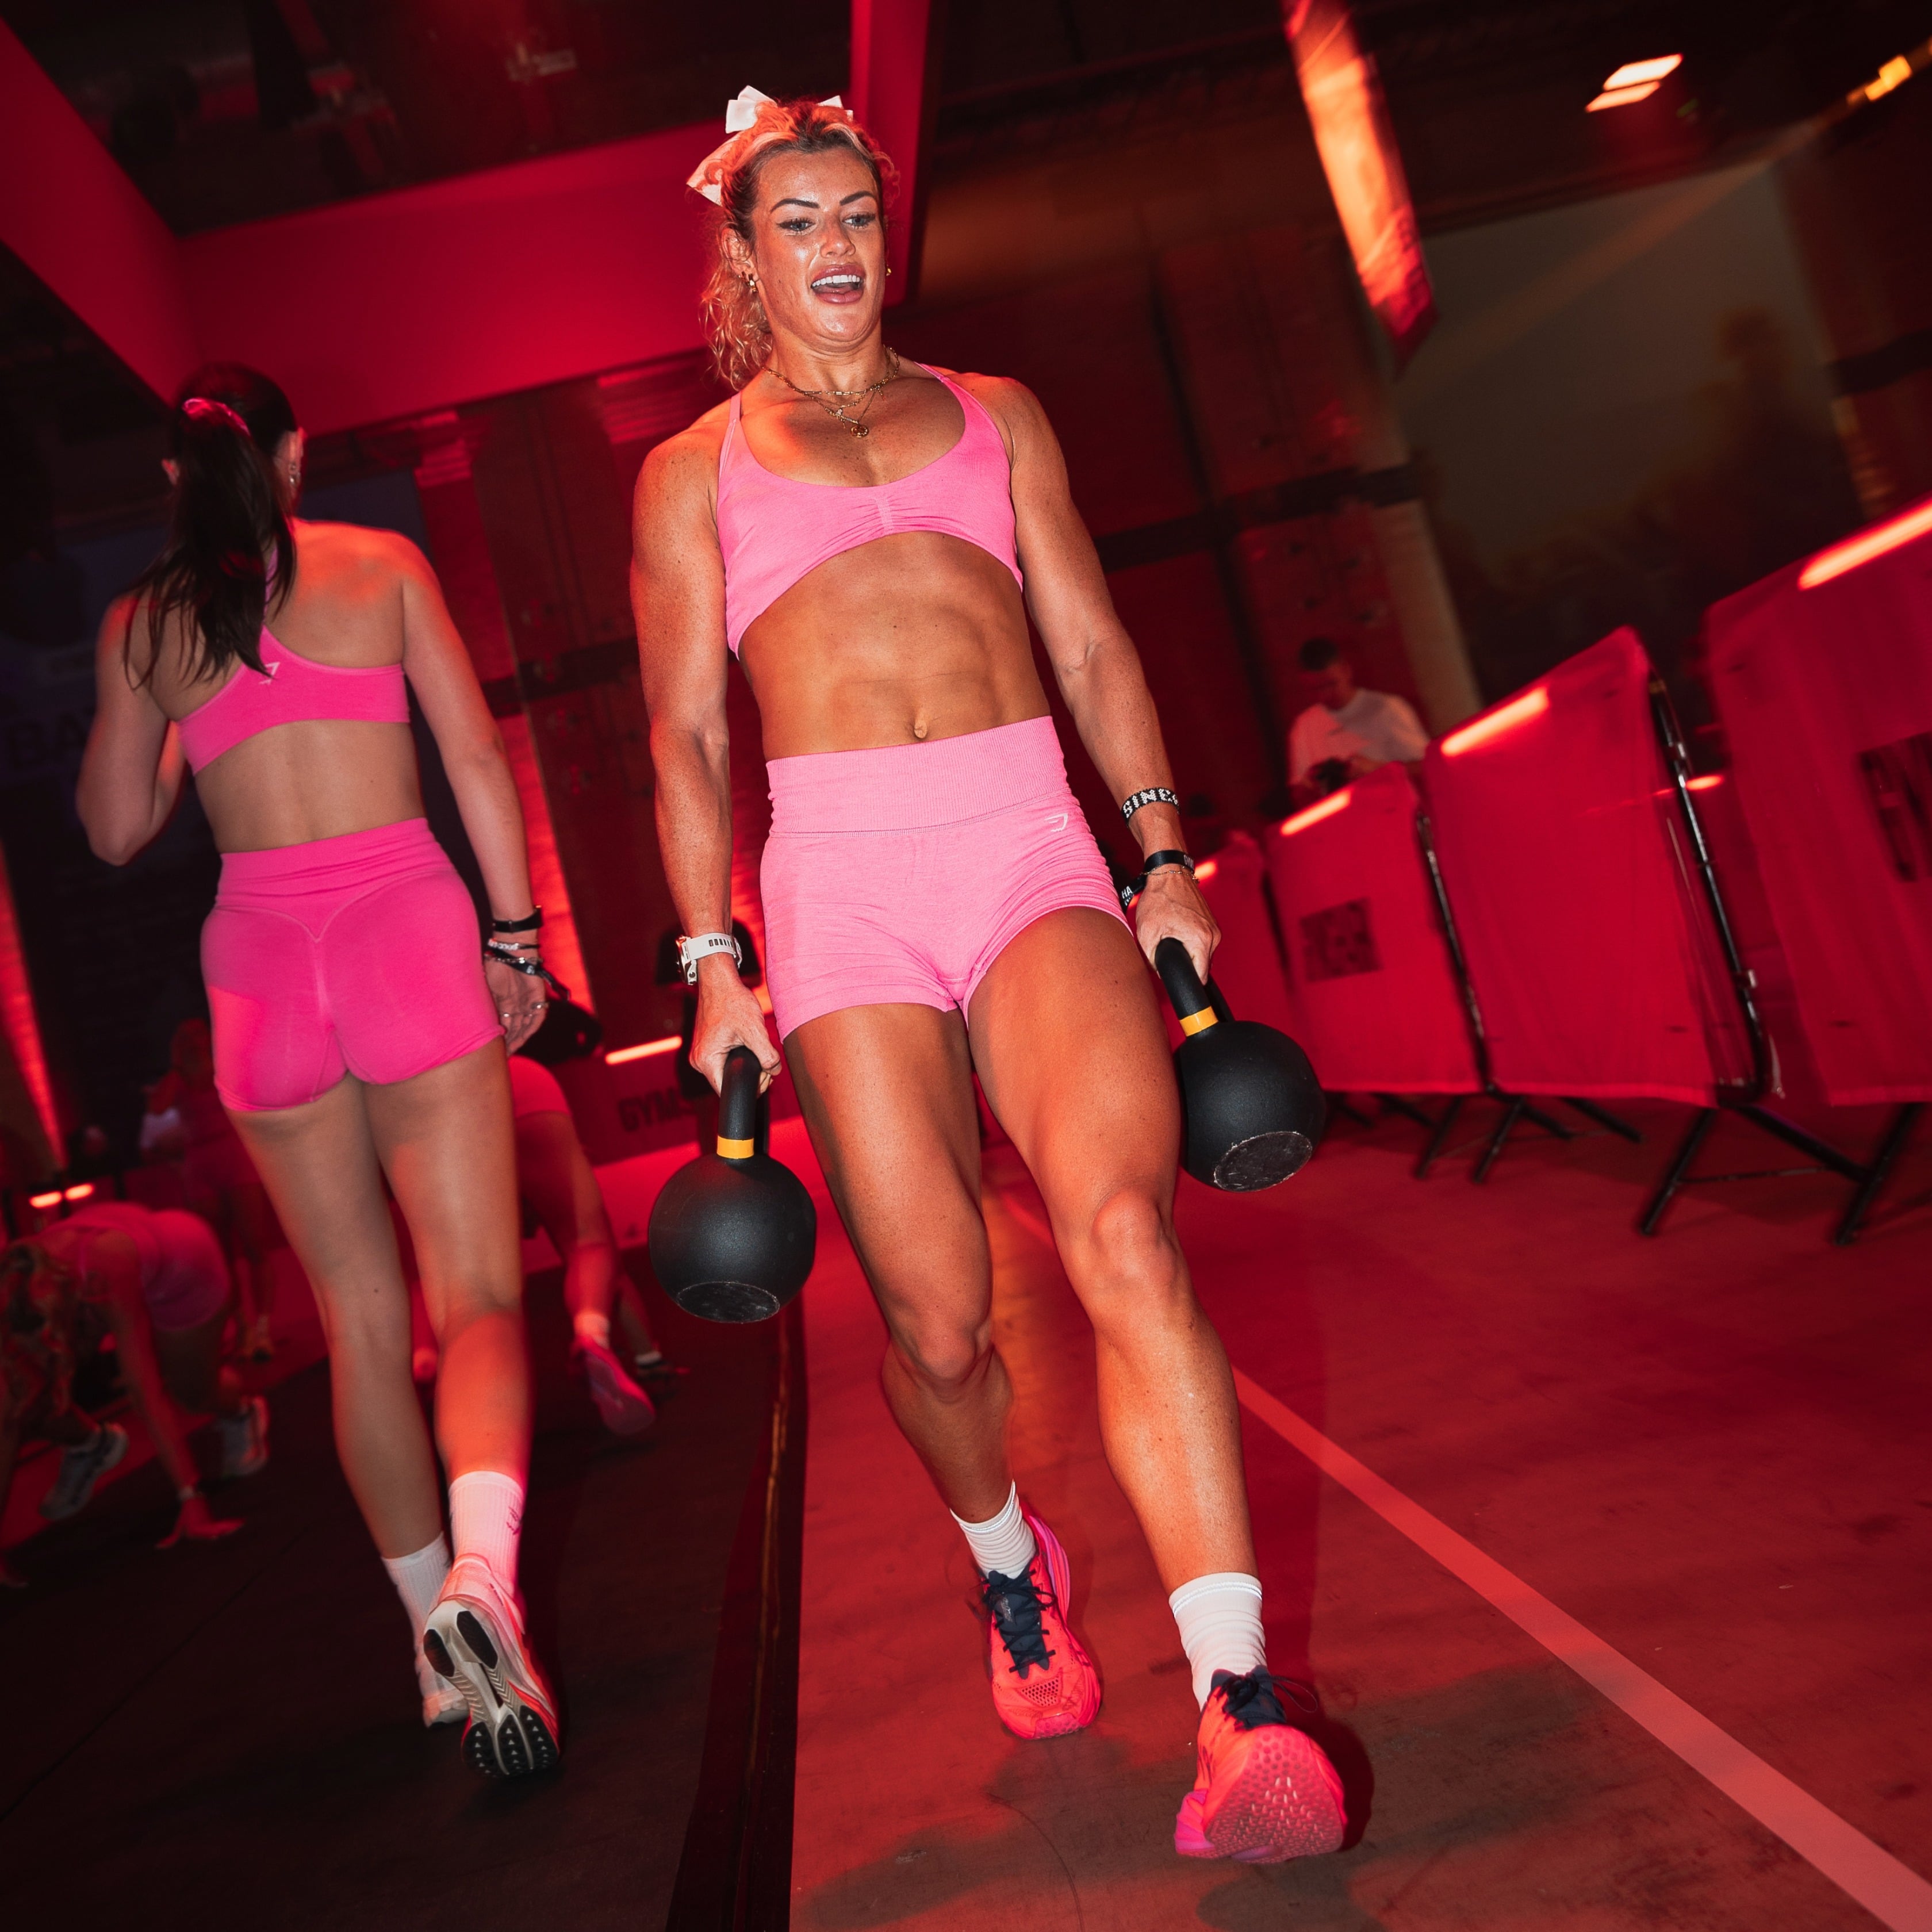
The farmer’s carry (AKA farmer’s walk) is a weighted exercise involving holding a pair of dumbbells or kettlebells (or specialised farmer’s carry handles) by your side as you walk for a certain duration or distance.
It’s a functional, endurance-focused, and isometric exercise (which means holding a position under tension) that’s simple to learn and suitable for beginners to advanced athletes. It activates the whole body, particularly challenging grip strength, core stability, and posture.
The farmers carry is a staple in strongman training and the sixth station in a Hyrox race. It’s also widely used in functional fitness, rehab, and athletic programs due to how effectively it builds real-world strength.
How To Do A Farmer’s Carry
Pick up a pair of heavy weights — dumbbells, kettlebells, or handles — and stand tall with them at your sides, knuckles facing down, palms facing in.
Engage your core and pull your shoulders slightly back and down.
Stand upright with a neutral spine, chest up, and eyes looking forward.
Walk slowly and steadily, taking controlled steps without leaning or letting the weights swing.
Stop after your set distance or time, then put the weights down with good form.
Form Tips:
Engage your core to protect your lower back and improve stability. Think: ribs down, and brace like you're going to be punched.
Stand tall and look ahead, not down. Pull your shoulders back and down to maintain a good posture and avoid leaning to one side (particularly if you are doing unilateral farmer’s carries).
Grip the weight tightly–not only will this help you hold the weights, but a firm grip will prove your grip strength even more. Avoid swinging the weights as you walk. If you struggle to hold onto the weight for long and find it slipping, practice some forearm strengthening exercises.
Take controlled steps–don’t rush. This forces your glutes, hamstrings, calves, and core to work harder, and increases time under tension to boost strength and muscular endurance. The exception is if you’re competing in a Hyrox race, in which case you should go as fast as possible while still moving safely. Focus on taking even steps to help with balance.
Go heavy–the weight should feel challenging! But always make sure you can maintain good form throughout. If you’re new to farmer’s walks, start with a light weight (roughly 50% of your bodyweight split between the two weights), and then increase the weight accordingly once you have built your confidence and mastered good form.
Already got to grips with how to do the farmer’s carry? Scroll down the variations to increase the difficulty, or jump to specific Hyrox farmer’s carry training & race day tips.
What Muscles Does The Farmer’s Carry Work?
The dumbbell & kettlebell farmer’s carry is a full-body strength and conditioning exercise that primarily targets the:
Forearms and Grip Muscles: Engaged to maintain a firm grip on the weights throughout the farmer carry.
Traps (Upper & Middle): Help you maintain good posture and prevent your shoulders from being pulled down by the weights.
Core MusclesHelp improve anti-rotational and anti-lateral flexion strength (resisting twisting and side-to-side bending) and keep the spine tall and braced under load.
Farmer’s carry also engages secondary muscles for support and stability. These include:
Shoulders: Prevents excessive swinging or sagging of the arms.
Back muscles: Help maintain posture and spinal alignment under load.
Glutes and Hamstrings: Support hip extension and help stabilize the pelvis.
Quads and Calves: Contribute to balance and support the load as you step forward.
What Are The Benefits Of The Farmer’s Carry?
Improves Grip Strength
Building your biceps? Sure. Leg day? Never skip it. Grip strength? Probably not top of your weekly workout priorities–but it should be. Having a strong grip will massively benefit your other lifts, from deadlifts to sled pulls, rows to kettlebell swings. The ability to hang onto the weight for longer means you can focus on working the muscles you want to target to the max, and not be let down by your grip failing.
Enhances Core Stability and Anti-Rotation
It’s easy to rely solely on crunches for ab training, but research has proven core stabilisation exercises, such as the farmer's carry, are more effective. This is because farmer’s carries work the core the way it actually functions: to stop motion and stabilize, rather than just flex the spine, as exercises like sit ups do [1,2].
A 2024 study compared the farmer’s carry to other carry and hold exercises, and found the farmer’s carry exercise to produce greater core activation than a farmer’s hold because it works the core across multiple planes: resisting flexion, extension, and lateral motion [3].
Builds Postural Strength
Guilty of sitting down for 8+ hours a day? You aren’t alone. But spending our days moving from sitting in the car, at our desk, or on the sofa takes its toll on our posture. Holding a pair of heavy weights, standing with your chest tall, and retracting your shoulders trains the very muscles responsible for posture (traps, rhomboid, and rear delts).
Boosts Conditioning & Fatigue Resistance
Just a few lengths of the farmer’s carry can quickly elevate your heart rate, making it an effective low-impact conditioning exercise—unlike high-impact activities like running. Plus, it’s easy to learn and comes with a relatively low risk of injury.
Develops Full Body Strength
It’s not just your grip that will benefit. The kettelbell & dumbbell farmer’s carry works the shoulders, traps, core, glutes, hamstrings, quads, and calves all at once. The movement is functional, meaning it is highly transferable to real-life strength, whether it’s carrying heavy shopping bags, picking up a heavy suitcase, or even a child.
Farmer’s Carry Variations
1. Suitcase Carry
The suitcase carry (or single-arm farmer’s carry) is a unilateral variation of the farmer’s walk involving holding a weight in one hand and walking for a set duration or distance. This offloaded set-up challenges the core to a greater degree, as you have to work hard to resist rotating or bending to the side.
A 2024 study published in the International Journal of Exercise Science supports this, finding the suitcase carry outperformed both the farmer’s carry and plank in activation of the spinal stabilizers (muscles that support and control movement of the spine) [3]. They also found increased activation in the rectus abdominis (front of the core) and obliques on the side holding the weight, while the other side showed similar side core activation to a plank.
How To Do A Suitcase Carry:
Pick up one dumbbell or kettlebell using proper deadlift form (keeping your back flat and core engaged).
Stand tall, shoulders level, with the weight held firmly at your side.
Brace your core to prevent leaning or twisting to the side. Focus on keeping your ribs down, glutes tight, and hips square.
Walk forward slowly and steadily for a set distance or time, keeping an upright posture.
Turn around carefully, then switch hands, passing the kettlebell or dumbbell to your opposite hand. Then, repeat the walk on the other side.
Tip: Always look ahead as you walk, not down. Don’t let the weight pull your shoulder down or cause you to shrug.
2. Rack Carry
A rack carry is a loaded carry with one or two weights (usually kettlebells, but it can be dumbbells) held in the front rack position. The weights should rest at shoulder height with elbows bent and tucked in.
It doesn’t challenge grip strength in the same way as the farmer’s carry does, but where the front rack carry does stand out is its ability to enhance upper body strength, particularly in terms of isometric tension (holding a loaded position) and shoulder and scapular stability.
How To Set Up For A Rack Carry:
Place two weights on the floor slightly in front of your toes (if using dumbbells, handles should be parallel to your feet; for kettlebells, place them shoulder-width apart, angled slightly inward).
Hinge at the hips, bend slightly at your knees, and keep a flat back. Take hold of the weights using a neutral grip (palms facing each other).
Swing the weights back between your legs, then drive your hips forward explosively, squeezing your glutes to propel the weight upwards.
As the weight slides up, shrug your shoulders, bend your elbows, and rotate your hands slightly as you do so.
Finish with the weight in your rack position–if using a kettlebell, it should rest in the “V” of your forearm and bicep; for a dumbbell, one head should rest on your shoulder, the other balancing in front of your body. Elbows should be just below or slightly in front of the weights.
How To Do A Rack Carry:
Stand tall with your elbow tucked, wrist neutral, and weight securely in place. Brace your core, keep your ribs down, and look straight ahead.
Walk forward slowly and steadily, taking short, smooth steps and avoiding leaning or twisting.
Continue walking for a set time or distance, then lower the weight by lifting it off your shoulders, bending your knees, and keeping a flat back as you return it to the ground.
Tip: The rack carry position can take a little getting used to. Holding weights in the front rack demands good shoulder flexion, external rotation, and thoracic spine extension. If you find the rack carry uncomfortable on your wrists, it is likely due to the weight not resting properly on your forearm and upper chest (especially with kettlebells). Check the placement of your weights, and if you are struggling to maintain the position, try some shoulder mobility drills.
You could also use a kettlebell rather than a dumbbell, as kettlebells naturally settle into a better rack position with less wrist strain. Or, try a single-arm rack carry first before progressing to a double-arm carry.
3. Overhead Carry
If bulletproof shoulders and overhead strength are your goal, then the overhead carry is an exercise you shouldn’t skip. This farmer’s carry variation involves holding two weights (usually dumbbells or kettlebells) locked out overhead while walking a set distance or time.
The overhead carry is one of the best isometric (static hold) exercises for developing strength, stability, endurance, and control in the overhead position. These are crucial for pressing, Olympic lifting, calisthenics, and general shoulder health.
The rotator cuff, traps, and scapular stabilizers work isometrically to keep the shoulder centered in the joint, resisting unwanted movement. This is key for injury prevention–especially in dynamic sports or pressing exercises, where shoulder injury is common [4,5].
How To Set Up For An Overhead Carry:
Start with a single weight or two weights on the floor slightly in front of your toes.
Clean the weight into your rack hold (as above for the rack carry). If using a kettlebell, this should rest in the ‘v’ of your arm, on your bicep and forearm. For a dumbbell, one head should rest on your shoulder.
Then, keeping your torso upright and core bracing, dip straight down, bending at the knees and hips into a quarter squat. Then, push through the floor with your quads and glutes, extending your hips and knees quickly to create upward momentum.
As you do so, use momentum to press the weights overhead. Your wrists should be stacked over your shoulders, your biceps by your ears, your knuckles facing up, and your palms facing each other. Lock out your elbows, engage your core and glutes, and stack the weight over your midline.
How To Do An Overhead Carry:
Brace your core and glutes (think “ribs down, glutes on” to avoid arching your back). Stand tall with shoulders packed down.
Begin walking slowly with control. Look straight ahead and keep your biceps close to your ears. Push the weights up to the ceiling.
Continue walking for a set time or distance, keeping your body in a straight line from heels to knuckles.
When you have finished, return the weights to rack position, keeping a soft bend in the knees as they reach your shoulders. Then, safely return the weights to the ground.
Tip: It can be easy to let your back arch and ribs flare. If you find this happening, think about pulling your ribs down and tightening your abs. Be conscious of not letting the weights drift out–focus on keeping your biceps pinned close to your ears.
The overhead carry can also be performed using a single weight (called a ‘waiter's carry’). This variation requires greater core engagement to resist the side bend.
4. Trap Bar Carry
A trap bar carry (or hex bar carry) is a loaded carry exercise where you walk while holding a trap bar (hex bar) loaded with weight plates.
The trap bar's shape allows you to stand inside the bar, keeping the weight in line with your center of gravity, unlike traditional dumbbell or farmer’s carries, where the load is beside your body. This reduces any strain on the lower back. Carrying one solid object rather than two independent ones also makes it easier to stabilize the load and prevents one side from fatiguing faster, which often limits the load in the farmer’s carry.
Trap bar deadlifts are suitable for beginners who can’t yet stabilize two dumbbells; lifters recovering from injury who want safer load distribution; and those who want to lift as heavy as possible.
How To Do A Trap Bar Carry:
Load the trap bar and step inside. Stand in the center of the trap bar with feet hip-width apart, toes pointing forward.
Hinge down as if you were doing a deadlift (keeping a neutral spine and chest up) and take hold of the handles in a neutral, full grip (thumbs around). Grip the Handles with arms straight and shoulders set down and back.
Brace and deadlift the bar up, pushing through your heels and engaging your glutes and core to lift it to a standing position.
Begin the walk, taking slow, deliberate steps with a neutral spine, chest up, and eyes forward. Avoid leaning or letting the bar swing.
After walking your desired distance or time, pause, hinge at the hips, and lower the bar with control.
Tip: Focus on tension throughout your entire body–squeeze your glutes, grip tight, and activate your lats (imagine "screwing your shoulders into your back pockets”). Keep a neutral spine (think about walking like you’re balancing a book on your head) and take short, deliberate steps—like a controlled march.
Farmer’s Carry For Hyrox: Training And Race Day Tips
Farmer’s carries are the sixth station in a Hyrox race, and it’s one of the easiest exercises to neglect in your Hyrox training, but failing to practice this exercise, build enough grip strength, or polish your technique can cost you precious seconds.
‘[the farmer’s carry is] a pretty easy station comparatively but if you drop [the kettlebells] you can lose quite a bit of time, so definitely practice under fatigue in training.’ (Jake Williamson, Hyrox Elite 15 Athlete & New York Men’s Pro Doubles Champion, 2025)
Training your grip strength is the obvious way to minimize drops, but London 2025 Pro Doubles Women champion and Elite 15 Athlete, Sinéad Bent, explains:
‘It's not just about grip strength - though that’s huge - it’s about posture and composure under fatigue. To help with staying stable when fatigued I train core 3 times a week. Track running also helps with this.’ (Sinéad Bent, Hyrox Elite 15 Athlete & London Women’s Pro Doubles Champion, 2025)
The farmer’s carry Hyrox weights per division are as follows:
Men’s Open: 2 × 53 lbs (24 kg) kettlebells
Men’s Pro: 2 × 70 lbs (32 kg) kettlebells
Women’s Open: 2 × 35 lbs (16 kg) kettlebells
Women’s Pro: 2 × 53 lbs (24 kg) kettlebells
Hyrox Farmer’s Carry Training Tips
Train Heavier Than Your Race Day Weight
Getting your body used to carrying heavier loads helps your musculoskeletal system adapt to greater demands, making the race-day weight feel much easier, especially when you’re already fatigued (which you will be by that point in the race!). (FYI: Don’t start with this weight. Start light and build up gradually to a heavier weight).
Progress Your Distances
Start with shorter carries (20–40m) and gradually build up to 200m or beyond to improve endurance and pacing. Again, practicing carrying for longer will make race day feel easier.
Practice How To Hold The Kettlebells
The regular farmers carry grip involves holding the kettlebell in the center of the handle, however, some Hyrox-ers, like Sinéad Bent, prefer to holding it toward the front of the handle, closer to where the horns meet the bell, as she finds this grip ‘helps to avoid swinging’.
Try out each position to find what works for you. You should also practice using hook grip (securing your fingers under your thumb), which will give you a more secure grip and help you grip for longer.
Train Compromised
Simulate HYROX conditions by doing carries after burpees, sleds, runs, or ski erg—this prepares your body for performing under fatigue. Practice these farmer’s carry workouts again and again, including it regularly in your Hyrox training.
Practice Your Pacing And Strategy During Training
Work out your pace and when you will put down the weights (if necessary).
If I were to do [the farmer’s carry] fresh,’ explains Jake, ‘I could go at a faster pace–but remember in a Hyrox you’re already 6km in, so you’re pretty fatigued!’
If you are in a pair, you should practice your changeovers during training, too. (Tip: Some pairs use a midair hand-off, where the next team member runs behind the person carrying the kettlebells and reaches forward to take the weights off their partner at a pre-planned switch point.)
Include Grip-Specific Work
To directly target grip strength, add dead hangs (try three max hangs multiple times a week), towel hangs, or fat grip dumbbell work.
‘Throughout the year I’ll train grip indirectly through deadlifts, hanging and more recently, pull ups,’ explains Sinéad.
‘Closer to the event, I’ll include farmers carry as an exercise 2 days a week. One day will be heavy carries for shorter distances, and another day race weight over longer distances. And sometimes, under fatigue after a workout, to train breathing and bracing under pressure.’
Hyrox Farmer’s Carry Race Day Tips
Don’t Sprint
Take small, quick steps, maintaining a steady, brisk walk to avoid bouncing the weights on your legs. Maintain straight arms by your sides.
‘You’ll almost find a speed at which you just slot into depending on how you feel in the race,’ notes Jake. ‘Because it won’t be faster than your running pace from the previous km it shouldn’t be too difficult to sustain that the whole 200m.’
Grip Smart
Grip the kettlebells deep in your palms, not just your fingers, to reduce grip fatigue. Use the technique you have practiced during training (centered grip or rear-offset grip)–don’t try something new at this point!
Keep The Kettlebells Close
Don’t let them drift away from your body! Having them close will mean you use less energy controlling them, making them easier to carry.
Minimize Drops
If you must drop the weights, do it quickly and in a planned spot. Rest for a few seconds, reset your grip, and get moving again.
Breathe And Relax
Don’t hold your breath—controlled breathing helps you maintain posture and rhythm.
Treat It As A ‘Controlled Grind’
The more efficiently you move through this station, the more energy you’ll have left for the rest of the race—especially the final run and the last station (wall balls), where you’ll need to dig deep and give that final push.
‘Find a rhythm, focus on your breathing, and stay nice and relaxed before the last 2 stations,’ advises Jake.
@gregorandhattie Avoid Making these Mistakes at the Farmers Carry in HYROX Hybrid Programs Link in Bio 📈 #gym #fyp #gymtok #hybridathlete #hyrox #hyroxtraining #hyroxcoach #hyroxtips ♬ original sound - ALTÉGO
All In All
Whether you’re chasing podiums, race-day PRs, or simply want to hold onto a barbell like your life depends on it, the farmer’s carry delivers.
It’s simple, effective, and trains a foundation of strength that doesn’t just look good but shows up when it counts. From sandbag pickups to pull-ups, deadlifts to sled pulls, a stronger grip and rock-solid posture are your foundation.
So load up, lock in, and walk with purpose. Don’t underestimate this exercise; it might be exactly what you need.
Whether you’re looking to reach a new PB or lock into Hyrox training, the Gymshark Training App has your back. With 100s of free workouts, soon you’ll be lifting heavier or running faster than the guy or girl next to you–trust us.
FAQs
How Heavy Should A Farmer’s Carry Be?
How heavy a farmer’s carry should be depends on your training goal — whether it’s grip endurance, max strength, speed, or conditioning.
Combining heavier carries (that build max strength) with lighter carries (that build endurance and time under tension) is usually a good idea. This means you’ll build raw strength in your forearms, hands, and upper traps, which will help you hold your grip for longer–crucial during Hyrox!
If you’re starting with farmer’s carries, start with 50% of your bodyweight split between the two weights. As you get confident with the movement, increase the weight. The carry should feel challenging, and you should struggle to grip onto the weight at the end!
Why Is The Farmer’s Carry So Hard With Dumbbells?
Unlike the trap bar carry that evenly distributes weight through one solid object, a dumbbell farmer’s carry involves two independent weights that you must balance and stabilize as you walk. Unlike kettlebells, the dumbbell head may also hit the front of your leg when you walk, which can feel awkward for some. You have to engage your core, lats, and shoulders to work hard to stabilize the dumbbells. For this reason, some might find dumbbell farmer’s carries the most challenging variation.
Should I Use Lifting Straps to Help With My Grip Strength During The Farmer’s Carry?
No–Lifting straps can assist your grip and help you hold onto a weight for longer, and ultimately lift heavier, making them suited to exercises where grip strength is not your goal [6,7].
The farmer’s carry is designed to expose and challenge weak grip–so you want to make the exercise as difficult as possible and train to failure, which means not using lifting straps. This will help you build stronger hands, forearms, and wrist stability.
If you’re struggling with your grip strength:
Reduce the weight so you don’t need to use
Train grip-specific holds or carries on separate days
Use thicker grips (e.g., fat grips) to improve strength faster
What Exercises Can Improve The Farmer’s Carry?
If you want to get better at the farmer’s carry, there are some other exercises you can do to help:
Dead Hangs: Build grip endurance and shoulder stability by forcing your hands and upper back to support your bodyweight over time.
Heavy Deadlifts: Develop total-body strength, especially in the traps, back, and glutes, and reinforce bracing and lifting mechanics.
Suitcase Carries: Strengthen unilateral grip, obliques, and posture by resisting side bending with one-sided loads.
Trap Bar Carries: Allow heavier loads with a more stable and ergonomic grip, helping you train carry-specific strength and posture under fatigue.
Overhead or Rack Carries: Challenge core, shoulder, and postural stability, making farmer’s walks feel easier by comparison.
Pallof Press: Teaches you to brace your core and resist rotation, helping you maintain a strong, upright posture during carries.
Wrist Roller & Fat Grip Work: Directly target forearm and hand strength to enhance grip capacity for longer or heavier carries
Can You Build Muscle With The Farmer’s Carry?
Yes, but muscle growth is often slower and less pronounced than other compound lifts, such as squats or deadlifts.
The farmer’s carry is primarily an isometric and endurance-focused exercise, rather than hypertrophy. Still, if you combine heavier weights, longer carries, and combine with progressive overload principles, you may see some muscle gain, especially in the traps, core, and upper back.
The farmer’s carry excels in muscular strength and endurance gains–particularly in the forearms, traps, core, and upper back. These muscles work to hold heavy weights and stabilize your body while doing so. Strengthening these muscles can indirectly help you build more muscle, allowing you lto ift heavier during and complete more reps, with better form during other compound lifts.
How Far And How Heavy Is The Farmer’s Carry In Hyrox?
In HYROX, the farmer’s carry is a 200-meter bilateral kettlebell carry (usually done in laps (e.g. 2 x 100m or 4 x 50m, depending on venue layout)–and the weight you carry depends on your division:
Men’s Open: 2 × 53 lbs (24 kg) kettlebells
Men’s Pro: 2 × 70 lbs (32 kg) kettlebells
Women’s Open: 2 × 35 lbs (16 kg) kettlebells
Women’s Pro: 2 × 53 lbs (24 kg) kettlebells
During training, it’s a good idea to practice using a heavier weight than your race day weight, for a longer distance, and under fatigue (e.g., practice 150–250m carry following a 400m run for four rounds).
What Is A Good Farmer’s Carry Time For Hyrox?
Your goal time will vary based on your overall conditioning and experience, but these are the recommended times based on ability:
Beginner: Around 1:45 to 2:15 minutes walking steadily.
Intermediate: Between 1:30 and 1:45 minutes walking briskly with minimal drops.
Advanced/Competitive: Under 1:30 minutes with a strong grip and fast pace.
Elite/Pro Level: Around 1:15 minutes or faster with powerful, aggressive movement.
The key is to minimize drops and maintain a consistent pace. You can walk briskly, but running is discouraged and may be penalized. If you’re in a pair, practice before race day and work out when you are switching, to save time on race day.
References:
Tsartsapakis, I., Bagioka, I., Fountoukidou, F. and Kellis, E. (2024). A Comparison between Core Stability Exercises and Muscle Thickness Using Two Different Activation Maneuvers.
Harvard Health Publishing (2019). Want a stronger core? Skip the sit-ups - Harvard Health.
Ellestad (2024). The Quantification of Muscle Activation During the Loaded Carry Movement Pattern.
Shim, S.S., Confino, J.E. and Vance, D.D. (2023). Common Orthopaedic Injuries in CrossFit Athletes.
Liaghat, B., Pedersen, J.R., Husted, R.S., Pedersen, L.L., Thorborg, K. and Juhl, C.B. (2022). Diagnosis, prevention and treatment of common shoulder injuries in sport: grading the evidence – a statement paper commissioned by the Danish Society of Sports Physical Therapy (DSSF).
Trahey, K.M., Lapp, E.M., Talipan, T.N., Guydan, T.J., Krupka, A.J. and Ellis, C.E. (2023). The Effect of Lifting Straps on Deadlift Performance in Females.
Coswig, V.S., Machado Freitas, D.F., Gentil, P., Fukuda, D.H. and Del Vecchio, F.B. (2015). Kinematics and Kinetics of Multiple Sets Using Lifting Straps During Deadlift Training.